Ironman + Deadpool

I have wanted to build a suit of Ironman armor for a long time now, and this year I decided to bite the bullet and get it done. As I was looking through the copious variations shown in the live action movies, I stumbled on a picture of an action figure that someone had painted to match Deadpool and I was just floored by how cool it looked. I decided to give it a shot, and combined parts from a few different editions of Ironman in an attempt to pull off a decent Deadpool variant.

I started with the helmet and thought that the grooves on the MK42 would work well with the eye patterns on the Deadpool mask. I made those patterns more angular than the traditional Deadpool mask to try and fit better with the lines of the helmet. I used my new Anycubic Photon to 3D print the helmet, and used the model provided by Jace1969 on thingiverse.com (thanks to Jace1969 for making such a greta model!). The pieces were too big for the print bed on my Anycubic, so I had to cut down the models into much smaller pieces that I epoxied together after the fact. The Anycubic has been a fairly recent purchase for me, and is a resin based SLA/LCD based printer. The results have been SO MUCH smoother than my FDM fifth generation Makerbot, but the print bed is much smaller.

I used super glue for the initial bonds, then reinforced with JB Weld for strength, and used spackle to smooth out the lines before painting. It is a bit of a process, but worth it for the results in my opinion. Same story for the rest of the helmet.

I used pieces of clear acrylic with small dots laser engraved onto the surface for the glowing eyes. There was one led glued to the side of each one, and when lit the engraved dots reflected the light made the surface glow fairly uniformly. When off I could see through it perfectly, and as long the lighting outside was fairly bright I could see decently when they were on (though in my basement I was functionally blind when they were turned on). I used a heat gun to soften the acrylic enough to bend into a curve to fit the eye sockets.

The chest and back are also from the MK42 edition of the armor, but I used my FDM fifth gen Makerbot to print these given the size. Even with the larger printer, I think those pieces ended up being around 18 individual prints, each of which took most of a day to print. Once all the pieces were printed, I used melted PLA (the same material they were made from) to seal the pieces together. This forms a pretty solid bond since it melts into the existing pieces and hardens as though it is all single unit. The seams are still quite a bit thinner than the main pieces though, so I reinforced it with fiberglass.


The FDM printer can handle a much larger build volume, but the print surface is much rougher so there is a lot more work to be done to smooth the surface. This is done using many layers of spackle and filler primer with lots of sanding between each application. Once I gave up on making the chest any smoother, I painted and weathered it. I placed strong magnets inside the piece to hold the chest repulsor in place and put together a set of LEDs controlled by a push button to nestle inside the cavity. I then laser cut some acrylic to make the the Deadpool symbol for the front piece. Pressing the center of the Deadpool symbol turns the lights on and off (the light is much more diffuse in person than on camera).

The shoulders and arms were also printed on the Makerbot, and were smoothed, painted, and weathered the same way. I used nylon straps with plastic snap buckles to attach these pieces to one another. I bought an inexpensive jacket and glued straps to the fabric to hold the shoulders and arms in place.

The hands were printed on the FDM printer as well, but only because I made them before I got the resin printer. they would have been much better suited to a resin print. The back plate was attached using elastic straps and velcro, and the finger joints were each glued to the finger of a black painted nitrile glove.

The hand repulsors are a circular board with bright LEDs. The magnet switch activated controller that manages the LED brightness and sound effects are part of a kit that I picked up. I laser cut a clear acrylic disk to cover the LEDs and diffuse the light, and sewed that into a long cloth glove that I wore under the 3D printed pieces.


Below is a video of the sound and lighting effects of the hand repulsor from the kit I purchased.
The remainder of the suit was made using EVA foam using a pepakura template. This was mainly driven by the fact that it was already October by this point and I needed to have the costume ready for Halloween (note to self: add a link to the pepakura files). Normally pepakura templates are printed on paper, cut with an Xacto knife, glued together, and then coated in fiberglass to harden them. Foam templates are similar, but generally less complex because the edges of the foam can be glued together directly, whereas the paper variant requires lots of little tabs and inserts to act as a gluing surface.
Working with foam instead of paper can sometimes be tough because cutting clean edges out of foam is difficult. The laser cutter has made this WORLDS easier as it cuts clean edges every time and removes the most tedious step of working with pepakura.


To make the boots I started with an old pair of shoes and a set of heavy duty shop LEDs to act as the foot repulsors. I cut holes in the bottom of the shoes and ran velcro straps through shop lights and shoes to attach them so that they can be easily removed to change out the batteries. I then used more foam pepakura templates to make a shell around the shoes.
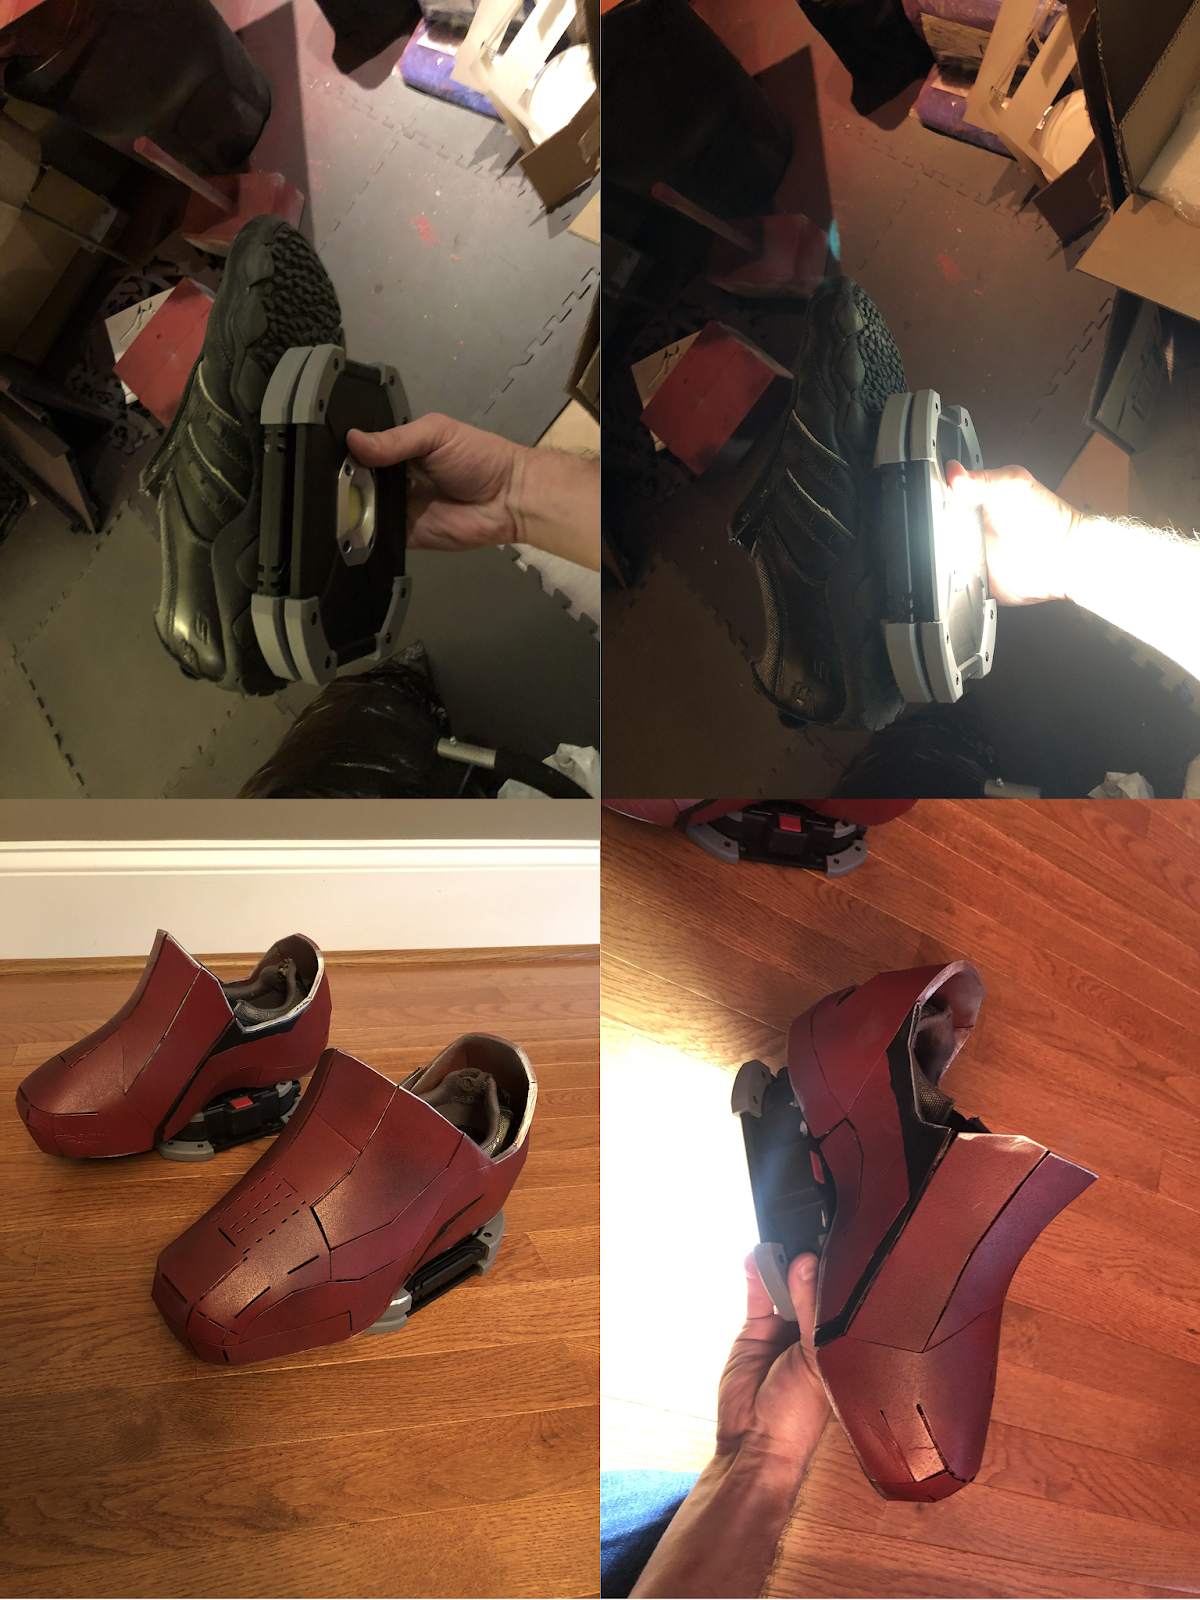
The foot repulsor LEDs show up pretty well indoors, but are less noticeable out in the sunlight.


Here is a quick video moving around in it and activating the hand repulsors:
It was a ton of work to complete the costume, but there is no way I could have done it without the help of my wife doing the lion's share of watching the kids for the month and a half that I spent in the basement working on it. Not to mention her begrudgingly but diligently helping me in and out of it at the company party.

No comments:
Post a Comment