Jack Skellington from The Nightmare before Christmas!

This Halloween I decided to try for a character that has been a Halloween favorite of mine since I was a little kid - Jack Skellington from The Nightmare before Christmas. This costume meant a lot to me because my mother passed away this year and Halloween was always a huge production in our family. She always handmade my costumes when I was a child and transformed the house inside and out with Halloween decorations. When I was older we always geeked out together about the costumes we were working on. Even throughout this last year in the hospital, we were talking through the costume she was going to wear once she got better (I was making the armor and she was sewing the clothing). Not being able to talk through this one with her as I built it made the process a bit sad, but I think she really would have liked it. This one is for you mom.

I started by modifying a 3D model of a skeletal hand. In the movie Jack has pretty simple, three fingered hands, but I thought it would be cool to do a more realistic version. The 3D model that I used a basis was obtained from thingiverse.com here: Skeleton Hands. Using Blender, I first split up the model along each joint, then created a groove within each one with a larger cylinder at the innermost edge. I also created a model of a piece which would fit perfectly inside the space created by those grooves. This is what I would 3D print and use to create the silicone "joint" pieces that would assist movement of the fingers. Finally, I added a small hollow cylinder to the mid-point of each finger bone. This created a channel that I could run a string (30 pound fishing line) through to pull each finger into a curling motion.

I put small metal hinges on the inside of each finger joint so that they would bend like a normal finger motion. A string was tied into the cylindrical holes so that the fingers could be pulled into the curled position. Once that was in place, I created a mold of the "joint" piece using Apoxie Sculpt and poured silicone into it. Once it cured, I was able to push it into the grooves at the finger joints and it provided the stretching mechanism that pulled the fingers straight again once pressure on the strings was released. Initially the fingers would bend at each joint much farther than a natural joint due to the hinge placement. I used a bit of Apoxie Sculpt at each hinge point to create a barrier which stopped the curling motion at a fairly natural point. After quite a bit of trial and error printing a few pieces, testing the movement, adjusting the model, printing again, rinse, repeat, I got to a point where I was pretty happy with the fingers and printed an entire hand.

Once the hand was printed and assembled, I made a frame that would attach to the base of it to hold my actual hand. I would slip my hand through the black circle at the bottom of the frame, and my thumb would rest upon/wrap around the cylinder in the center. The frame ended up being a little too wide initially (it made my arm look fat and flat), so I took it apart and trimmed it down to be narrower. I didn't get a very good picture of this after the fact.

Once it was all assembled, I sewed the strings from each finger into a glove that rested inside the frame, then painted the hand white, and attached a sleeve over the frame to extend the one in the jacket I would be wearing.

Now that the hands were completed, I moved on to the mask. This process was very similar to the one I used to make the Groot mask linked here: I am Groot!. For this mask I used some different materials though. The Groot mask was made using a silicone mold, which captures details really well, but was an epic pain when casting the mask and got destroyed in the process. For the Jack mask, I used Ultra-Cal 30 instead (essentially a mixture of plaster and cement). This created a very rigid mold, which held together well and was easy to cast with, but didn't capture details quite as well. The Groot mask itself was made out of Poly Foam, which sets really quickly and expands to fill the space between the mold and the life cast, but which did not hold paint very well - cracking and flaking eventually from the mask. The Jack mask was made out of latex, which doesn't expand (shrinks actually), and took a bit longer to cast. That said, by mixing acrylic paint with additional liquid latex, I was able to make a paint which stuck really well to the mask.

To make the mask, I used a cement life cast of my head as a base and sculpted the shape using an oil based clay. Once the sculpt was done, I used more clay to create a barrier around the front half of the sculpt. This barrier allowed me to cover the front half of the sculpt in Ultra-Cal without touching the back half. This is important for making a two part mold. I stuck marbles in the clay to create registration keys so that the two halves of the mold would fit together correctly when I poured latex into it later. Once the front half cured, I peeled away the clay and covered the edges of the cured Ultra-Cal with vaseline so that the two halves of the mold wouldn't stick together once the back half cured. I then covered the back with Ultra-Cal as well.
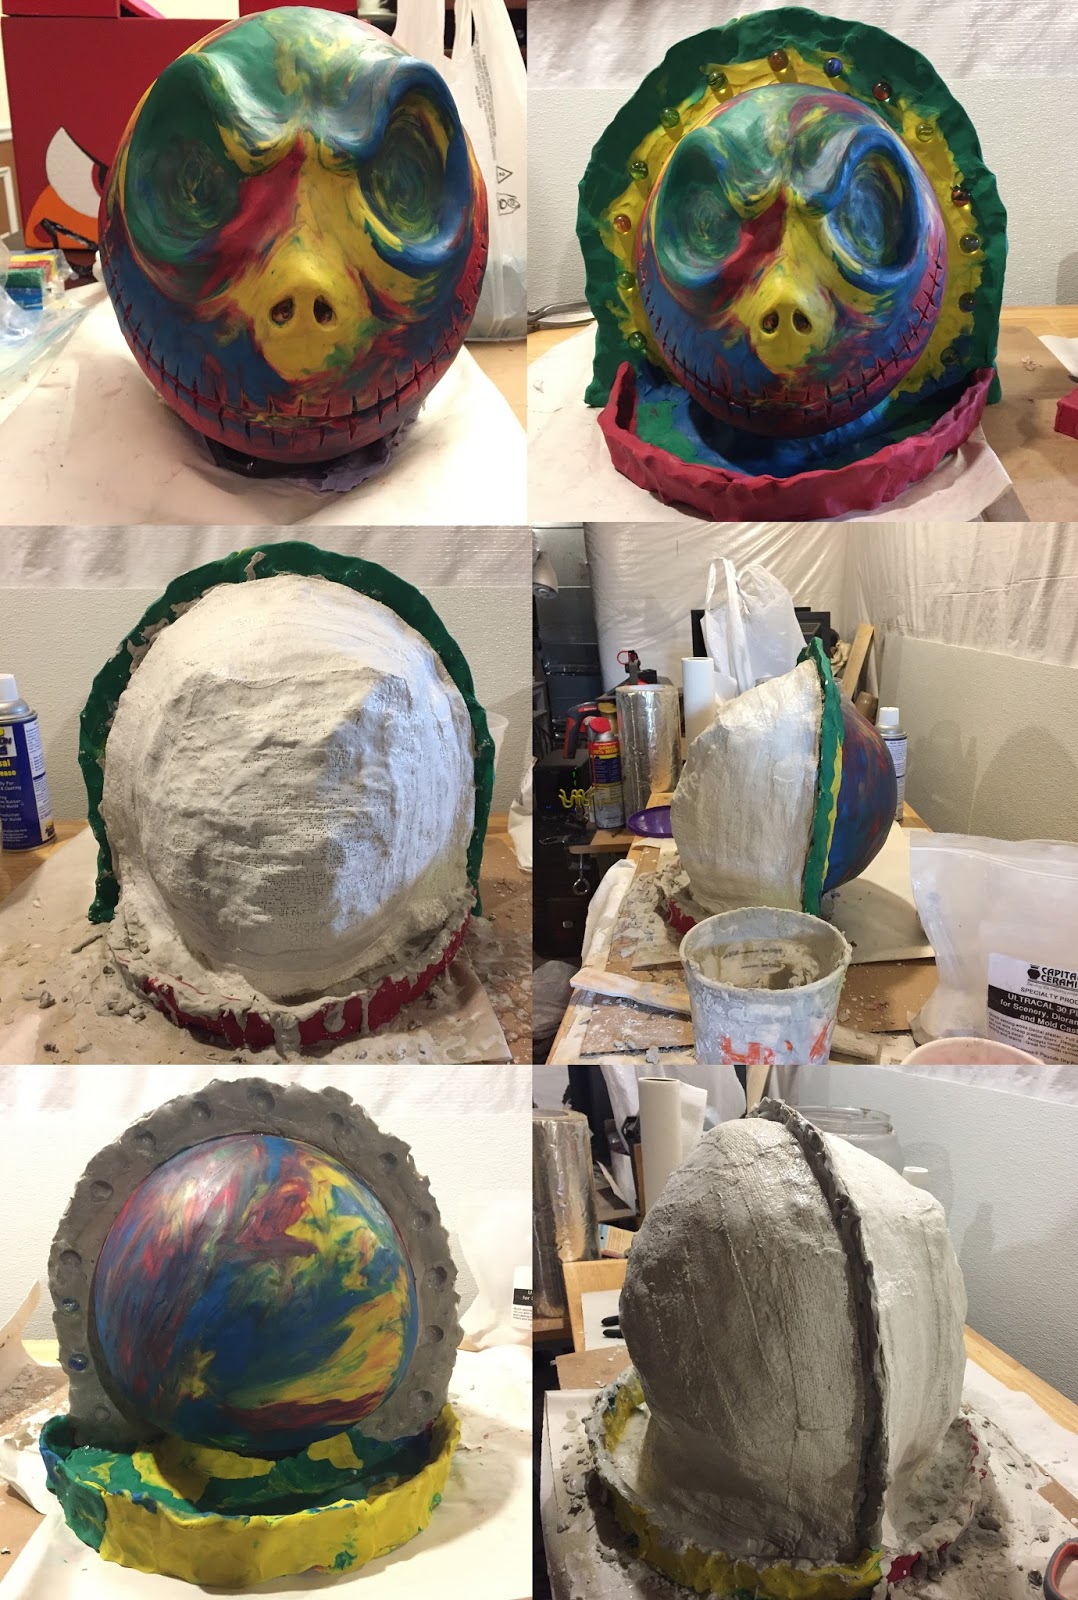
Once the mold was fully cured, I pulled the two halves apart and cleaned out the clay that had stuck to the Ultra-Cal. There were a few holes in the mold in which it didn't press tightly enough against the clay before hardening (a thinner solution of the Ultra-Cal produces better details, so that should be your first coat - mine was not thin enough in a few places). Luckily these spots were mostly on the bottom back of the mask. I decided to patch these with Apoxie Sculpt rather than using more Ultra-Cal to smooth it out. This was a mistake! The latex didn't cure as well against the Apoxie Sculpt, so it left some holes in the mask in those spots. Use Ultra-Cal to patch Ultra-Cal! I duct taped the two halves of the mold together, then sprayed the inside with mold release, and placed the mold upside down in a padded box. Once the mold was stable, I filled the entire thing with RD 407 Liquid Mask Latex. I let the latex sit inside the mold for an hour, and then poured the majority of it back into the bucket it came in. The longer you leave the latex sitting inside the mold, the thicker your mask will end up being because the latex that is touching the Ultra-Cal will cure over this period, but the remainder inside will remain liquid and can be re-used later. An hour resulted in a pretty thick mask, but if I did it again I would probably leave it a little longer simply because this mask doesn't really need to flex of bend at all while I am wearing it and thicker = sturdier.

Once the latex cured (I gave it about 24 hours), I carefully peeled it out of the mold, pouring talcum powder into it as I removed it. At this point, the latex still has some curing to do, but you want to pull it out because the latex shrinks as it cures (about 20%), so it can deform if it is left in the mold for too long. You should take this shrinkage into account when sculpting so that it will still fit on your head once it shrinks. The latex will stick to itself if you don't cover it in the talcum powder, and this could ruin your mask. Once it was out of the mold, I trimmed off the rough edges from the seals in the mold, and cleaned off most of the talcum powder. The back had the holes in it that I mentioned before, so I covered the inside with painters tape and then painted on layers of latex to fill in the gaps. After trying it on for size (and taking a terrible selfie since I could not see), I cut the eye and nose holes, and painted the mask using a 50/50 mixture of latex and acrylic paint.


Now that the mask was completed, I needed to make the rest of the costume. In order to accentuate Jack's long lanky frame (and fit the elongated arms), I used the same drywall stilts that I wore for the Groot costume. To make the jacket, I frankensteined two thrift store suit jackets. I cut and sewed the primary jacket short in the front, and made coat tails for the back, lining them with thick gauge wire so they would stay in a curled position. The bow tie was made from Apoxie Sculpt and craft foam. The pin stripes I hand painted on the night before the company costume contest (of a late night... procrastination is not your friend).

To make the pants I sewed four pairs of thrift store dress pants together in order to get the right length and width. In retrospect, it would have been much easier to just sew black material over a single pair of dress pants, but hind sight is 20/20. The company Halloween party with the wife was a lot of fun, and trick or treating with the kids tonight was a blast (my son was Jack this year as well - he loves the movie even more than I do).


Happy Halloween!