
I have been wanting a 3D printer for a long time now (I even funded a kickstarter for a Rappidelta 3D printer, which did not work at all and was horrible time consuming exercise in futility). I have finally pulled the trigger and bought the new Fifth Generation Makerbot Replicator. After anxiously waiting seven weeks for delivery (a tad longer than the one week they initially indicated), I came home to find to a gigantic box on my front porch with a Makerbot logo on the front.

To say that I was excited would be a definite understatement. The Makerbot came fully assembled and contained a spool of translucent PLA, some blue tape squares for the build platform, and a smart extruder. The smart extruder is pretty cool - it contains the mechanism which feeds the filament and the hot end which brings it to its melting point and extrudes it onto the platform. The smart extruder attaches to the main system via magnets which pull into the correct orientation. It was super simple to attach and presumably replace if there is ever a problem with the current one.

(image courtesy of makerbot.com)
The PLA spool fits into a compartment at the back of the unit which slides up and down for access. The PLA filament then feeds through a tube which holds it above the system and then into the extruder.

(image courtesy of makerbot.com)
The first thing you want to do is level the build plate (if you already fed filament into the extruder then the system will make you unload it prior to leveling the build plate). The UI on the system is pretty intuitive and is controlled by the knob on the front which you twist to scroll through options and push to select items. There are also two buttons which generally provide 'go back' and 'more options' functionality. The 'level build plate' utility moves the extruder around on the plate and directs you to turn the two knobs on the bottom in various directions until it is level. NOTE: The quickstart instructions tell you to level the build plate and then load the filament. You will DEFINITELY want to run the build plate leveling utility three or four times you first get it as it is way off initially and requires a couple of iterations to really get level. I was not able to successfully start a print job until I did this. Your next step is loading the filament, which the UI walks you through pretty intuitively.
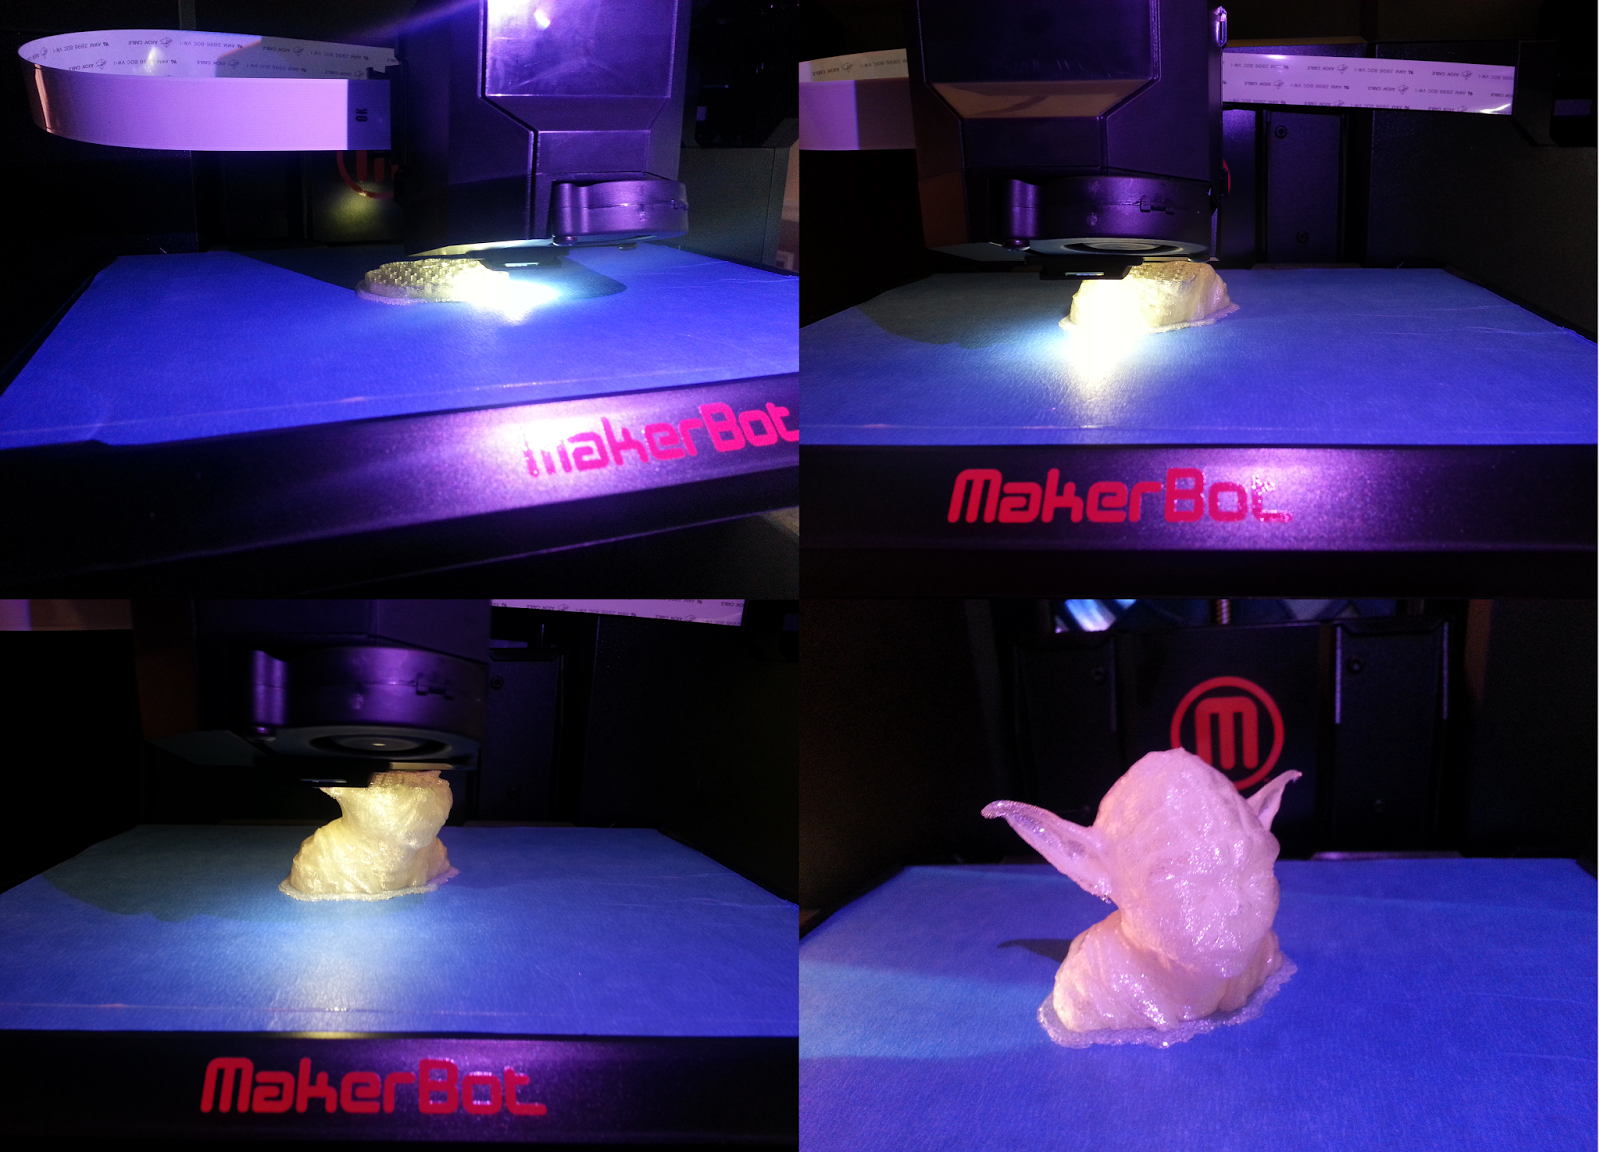
For my first print I downloaded a yoda bust from www.thingiverse.com. The files on the site generally .stl format. The Fifth Generation Replicator comes with the Makerbot Desktop application (a free download from the their site as well) which pull in the files from Thingiverse and convert them into a format that the 3D printer can interpret (.makerbot). From there, you can either save the files to a thumb which plugs into the front of the makerbot, or connect a USB cable from the makerbot to your computer and kick off the print directly from the PC or use an ethernet cable to connect the makerbot to the same LAN as the your PC and do the same. The desktop software is supposed to automatically detect the makerbot, but I have generally needed to type in the IP address in order to find in (IP is displayed in the info section on the makerbot UI). The device is equipped with wifi, but apparently that functionality is coming is a future firmware update.

The print came out pretty well and I was extremely happy with it as a first print. It is a bit tough to see the details with the translucent PLA, so I threw a coat of green spray paint on it and called it a day. The default settings on the Replicator print the object at medium quality on a raft of PLA which helps prevent warping of the object as it prints. You can then just pop the raft off the bottom once the print finishes. It also has the ability to print with supports which hold up the overhanging pieces, but I did not use them on this print and it went extremely well. The supports can be a pain to peal off and leave some residue which needs to be dremeled off afterwards, but they allow to print more complex models.
Since I got the 3D printer I have been printing objects almost constantly - and it awesome. I have had very few failed prints thus some (some minor warping when I tried to do too many objects at once). I have printed the yoda bust, a full sized pistol replica from the Halo series, a Chinese lion, a Tardis lamp, and various Doctor Who cookie cutters (the wife is a HUGE fan). Everything I have printed thus far I have downloaded from Thingiverse. I need to do some cleanup and painting on some of these, but here pictures of everything thus far:


(the weirdly shaped one is a silhouette of David Tennant's head)

The Tardis lamp is probably the coolest finished print so far (but the pistol will give it a run for its money once I get it painted). The Tardis printed as about fifteen different flat pieces which I painted and then assembled. The files also came with image files to use for the signs on the Tardis. Two of the pieces are placed inside and hold the 9 Volt battery and LEDs which are used to the light the unit from within. That build definitely helped soften the blow of the $3,000.00 printer with the wife.